
If you've landed here you're probably curious about AVS (Actively Validated Services) and how it fits into the whole blockchain scene. Whether you're a seasoned blockchain developer or just getting your feet wet, this guide is here to walk you through everything you need to know about AVS.
We'll start with the basics – what an AVS is – and then explore its key components like operators, stakers, and smart contracts. From there, we'll dive into the details of how AVS works, including interaction flow and validation processes. Finally we will get hands-on and build a simple "Hello World" AVS together.
Before we get into AVS, let's talk about EigenLayer – the foundation that makes all this magic possible.
What is EigenLayer
EigenLayer is a protocol built on Ethereum that introduces restaking, a new concept in crypto-economic security. At its core, EigenLayer consists of a series of smart contracts that allow users to "restake" their staked ETH or liquid staking tokens (LSTs) to bootstrap new proof-of-stake (PoS) networks and services within the Ethereum ecosystem in return for additional staking yield/rewards.
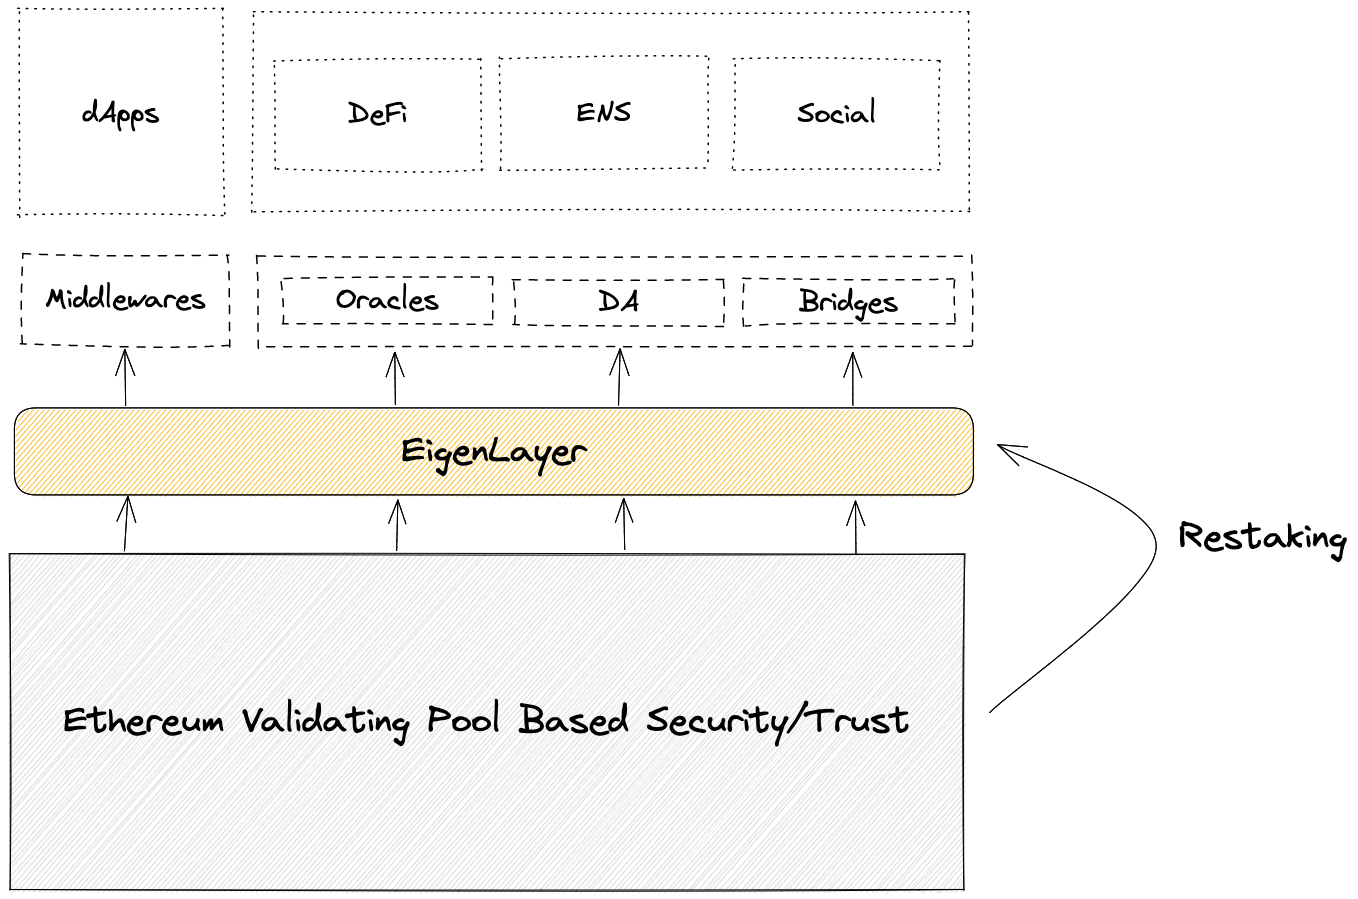
Diagram by by Jiawei | IOSG Ventures | Medium
In simple terms, EigenLayer is like a multi-tool for the blockchain world. It allows you to take the security and validation power from one place and use it in many different ways. Whether it's for securing data, running new virtual machines, or connecting different blockchains, EigenLayer makes it easier and more efficient.
Alright, let's get to the heart of the matter – what exactly is an AVS?
What is AVS
AVS stands for Actively Validated Services. It's a fancy term for a system that needs its own way of verifying data and transactions in a distributed manner. Think of it as a custom validator for all sorts of blockchain-related services.
You might be wondering what kinds of services we're talking about here. Well, AVS can be used for:
Sidechains: These are like parallel blockchains that run alongside a main blockchain.
Data Availability Layers: Systems ensuring data is accessible and secure.
New Virtual Machines: Custom environments for executing smart contracts.
Keeper Networks: Networks that manage tasks like liquidations and upkeep of certain protocols.
Oracle Networks: Services that bring off-chain data to the blockchain.
Bridges: Connect different blockchains to enable asset transfers.
Threshold Cryptography Schemes: Advanced cryptographic methods for secure multi-party operations.
Trusted Execution Environments: Secure areas in a main processor.
In a nutshell, an AVS is any system that needs its own unique way of validating information to make sure everything is legit and secure. Each AVS has its own set of smart contracts that handle things like which operators are running the service and how much stake is securing it.
Pretty cool, right? Now that we've got a handle on what an AVS is, let's dive into the key components that make it all work.
Key Components of AVS
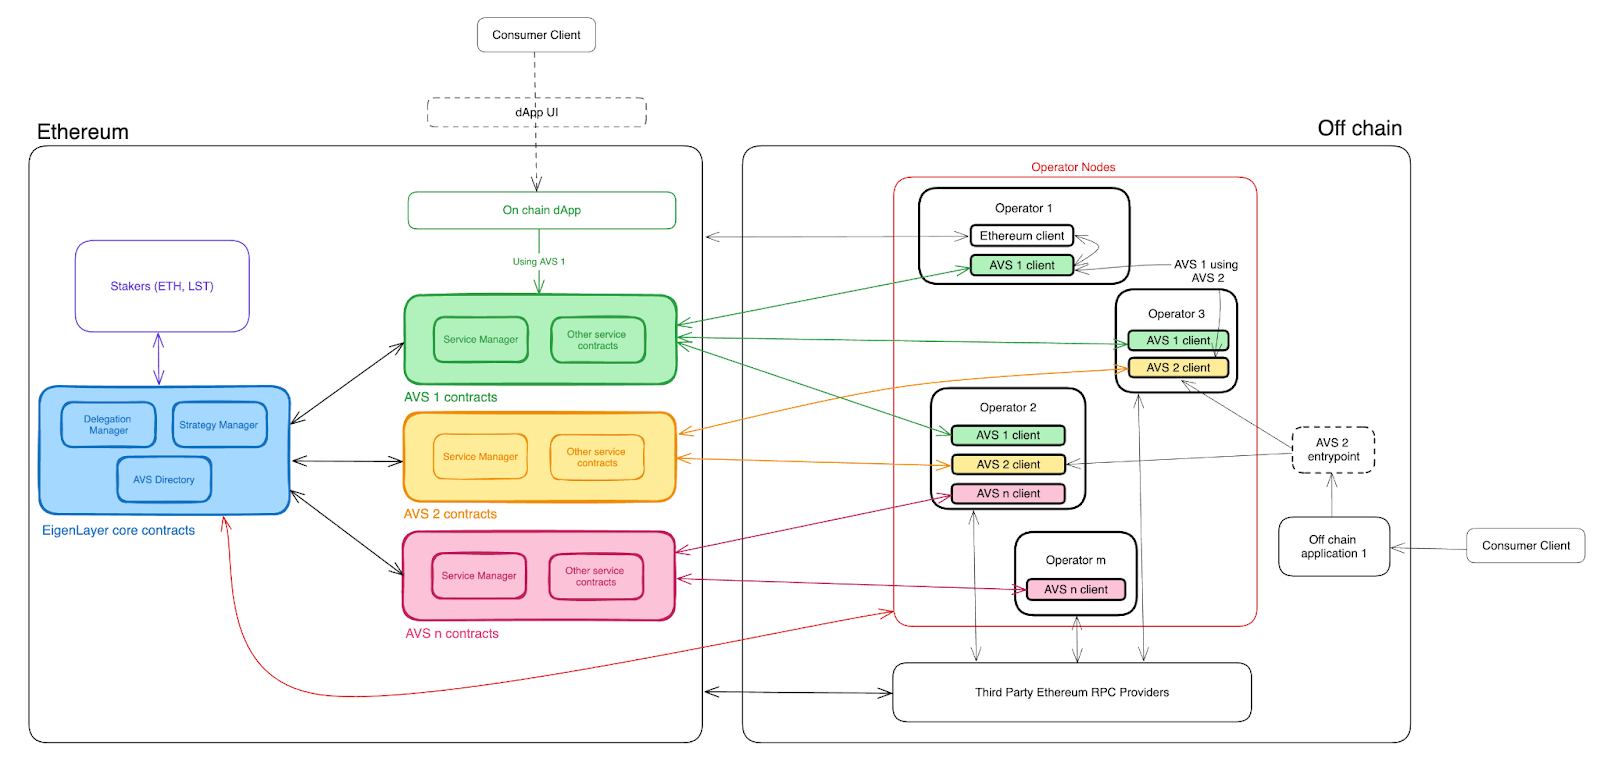
To understand how AVS works, we need to break it down into its core components: Operators, Stakers, and Smart Contracts. Each of these plays a crucial role in ensuring the system runs smoothly and securely.
Let's dive into these components – it's like understanding the different parts of a car engine. Once you know how each piece functions, you can appreciate the whole system better.
Operators
Operators are the backbone of AVS. They are responsible for running the off-chain client software specific to the AVSs they've opted into. Here's what they do:
Run Client Software: Operators run specialized software that performs tasks required by the AVS. This could involve anything from computing data to verifying transactions.
Register with EigenLayer: To become an operator, they must register with EigenLayer's DelegationManager contract. This registration is essential because it authorizes them to participate in the AVS.
Execute Tasks: Once registered, operators listen for tasks emitted by AVS contracts, perform the required computations or validations, and submit their results back to the AVS.
Security Role: Operators contribute to the security of the AVS by ensuring that tasks are completed accurately and reliably.
Smart Contracts
Smart Contracts are the glue that holds everything together. They manage the logic and state of the AVS. Here’s how they function:
Core Logic: Smart contracts define the rules and operations of the AVS. They handle everything from task generation to validation and reward distribution.
Interaction with Operators and Stakers: They manage interactions between operators and stakers. For example, contracts handle operator registration, task assignment, result submission, and reward distribution.
State Management: Each AVS has its own set of contracts that maintain the state relevant to its operation. This includes information about operators, stakers, and the tasks being processed.
Security and Reliability: Smart contracts ensure that all operations are executed in a secure and predictable manner, reducing the risk of errors or malicious activities.
Together, these components create a robust system that allows AVS to operate efficiently and securely. Operators perform the necessary tasks, stakers provide the security, and smart contracts orchestrate the entire process.
How AVS Works
To understand how AVS (Actively Validated Services) operates, it's crucial to break down the interaction flow and the validation process. These elements ensure that the AVS functions efficiently and securely.
Interaction Flow
The interaction flow in an AVS involves sevral key steps that enable operators and smart contracts to work together seamlessly. Here’s a step-by-step look at how this process typically unfolds:
Task Generation: The AVS smart contract generates tasks that need validation or computation. These tasks could range from data verification to complex cryptographic calculations.
Event Emission: Once a task is created, the smart contract emits an event. This event signals that a new task is available for operators to pick up.
Operator Listening: Operators, who run the off-chain client software, listen for these events. They continuously monitor the AVS smart contracts for new tasks.
Task Execution: Upon detecying a new task, operators perform the required computation or validation off-chain. This could involve calculations, data processing, or verifying transactions.
Result Submission: After completing the task, operators submit their results back to the AVS smart contract. This submission includes proofs or signatures that validate the accuracy of their work.
Aggregation (if needed): For tasks requiring consensus or multiple validations, an aggregation step may occur. Here, results from various operators are combined to form a single aggregated proof or signature.
On-Chain Verification: The AVS smart contract then verifies the submitted results. This involves checking the validity of proofs or signatures to ensure they meet the required criteria.
Reward Distribution: If the results are verified successfully, operators are rewarded for their work. Rewards are distributed according to predefined rules set by the AVS smart contract.
Validation Process
The validation process is critical to ensuring the integrity and security of the AVS. Here’s how it typically works:
Task Assignment: Tasks are picked up by operators who have registered with EigenLayer's DelegationManager contract. This ensures that only authorized operators can participate.
Proof Generation: Operators perform the required validation or computation tasks and generate proofs. These proofs are cryptographic evidence that the task was completed correctly.
Proof Submission: Operators submit their proofs back to the AVS smart contract. The submission process is designed to be secure and tamper-proof.
Consensus Mechanism: In cases where multiple operators are involved, a consensus mechanism ensures that the majority agrees on the validity of the proof. This can involve techniques like BLS (Boneh-Lynn-Shacham) signature aggregation for efficiency.
On-Chain Verification: The AVS smart contract verifies the proofs on-chain. This involves checking the cryptographic signatures and ensuring that the results meet the criteria defined in the contract.
Slashing (if necessary): If an operator submits an invalid proof or fails to complete the task, slashing conditions may apply. This means the operator could lose part of their staked assets as a penalty for non-compliance or malicious behavior.
Finalization: Once the proofs are verified, the task is considered complete. The AVS smart contract updates its state to reflect the successful validation, and operators are rewarded accordingly.
By following these steps, AVS ensures a secure and efficient process for validating tasks. This interaction flow and validation process are fundamental to maintaining the integrity and reliability of services built on the EigenLayer platform.
Building Your First "Hello World" AVS
Alright, now that we've got a handle on what AVS is and how it works, let's roll up our sleeves and build our first "Hello World" AVS. This part is all about getting your hands dirty and seeing how it all comes together.
We'll use the Hello World AVS repo as our starting point. Here's how you can clone the repo and get things set up.
Prerequisites
Before we jump in, make sure you have these installed on your machine:
Node.js and npm
Foundry (Ethereum dev toolkit)
Docker
Setting Up Your Development Environment
Clone the Repo
Open your terminal and run:git clone https://github.com/suhailkakar/hello-world-avs.git cd hello-world-avsInstall Dependencies
Run this to install the necessary dependencies:npm installEnsure Docker is Running
Make sure Docker is installed and running.Start the Chain with Contracts Deployed
Run this command to build the contracts, start an Anvil chain, deploy the contracts to it, and keep the chain running in your terminal:make start-chain-with-contracts-deployedStart the Operator Open a new terminal tab and run:
make start-operatorThis will compile the AVS software and start monitoring for new tasks.
Understanding the Code
Let's break down the key parts of the repo and see what's going on under the hood.
Don't worry if you hit a few bumps along the way – the first setup is always the trickiest, but it's also the most rewarding when you see it work!
Operators
The operator folder contains scripts to manage and monitor AVS tasks. Here’s a detailed look inside index.ts:
import { ethers } from "ethers";
import * as dotenv from "dotenv";
import { delegationABI } from "./abis/delegationABI";
import { contractABI } from './abis/contractABI';
import { registryABI } from './abis/registryABI';
import { avsDirectoryABI } from './abis/avsDirectoryABI';
dotenv.config();

const provider = new ethers.providers.JsonRpcProvider(process.env.RPC_URL);
const wallet = new ethers.Wallet(process.env.PRIVATE_KEY!, provider);

const delegationManagerAddress = process.env.DELEGATION_MANAGER_ADDRESS!;
const contractAddress = process.env.CONTRACT_ADDRESS!;
const stakeRegistryAddress = process.env.STAKE_REGISTRY_ADDRESS!;
const avsDirectoryAddress = process.env.AVS_DIRECTORY_ADDRESS!;

const delegationManager = new ethers.Contract(delegationManagerAddress, delegationABI, wallet);
const contract = new ethers.Contract(contractAddress, contractABI, wallet);
const registryContract = new ethers.Contract(stakeRegistryAddress, registryABI, wallet);
const avsDirectory = new ethers.Contract(avsDirectoryAddress, avsDirectoryABI, wallet);

const signAndRespondToTask = async (taskIndex: number, taskCreatedBlock: number, taskName: string) => {
    const message = `Hello, ${taskName}`;
    const messageHash = ethers.utils.solidityKeccak256(["string"], [message]);
    const messageBytes = ethers.utils.arrayify(messageHash);
    const signature = await wallet.signMessage(messageBytes);

    console.log(
        `Signing and responding to task ${taskIndex}`
    )

    const tx = await contract.respondToTask(
        { name: taskName, taskCreatedBlock: taskCreatedBlock },
        taskIndex,
        signature
    );
    await tx.wait();
    console.log(`Responded to task.`);
};

const registerOperator = async () => {
    const tx1 = await delegationManager.registerAsOperator({
        earningsReceiver: await wallet.address,
        delegationApprover: "0x0000000000000000000000000000000000000000",
        stakerOptOutWindowBlocks: 0
    }, "");
    await tx1.wait();
    console.log("Operator registered on EL successfully");

    const salt = ethers.utils.hexlify(ethers.utils.randomBytes(32));
    const expiry = Math.floor(Date.now() / 1000) + 3600; // Example expiry, 1 hour from now

    // Define the output structure
    let operatorSignature = {
        expiry: expiry,
        salt: salt,
        signature: ""
    };

    // Calculate the digest hash using the avsDirectory's method
    const digestHash = await avsDirectory.calculateOperatorAVSRegistrationDigestHash(
        wallet.address,
        contract.address,
        salt,
        expiry
    );

    // Sign the digest hash with the operator's private key
    const signingKey = new ethers.utils.SigningKey(process.env.PRIVATE_KEY!);
    const signature = signingKey.signDigest(digestHash);

    // Encode the signature in the required format
    operatorSignature.signature = ethers.utils.joinSignature(signature);

    const tx2 = await registryContract.registerOperatorWithSignature(
        wallet.address,
        operatorSignature
    );
    await tx2.wait();
    console.log("Operator registered on AVS successfully");
};

const monitorNewTasks = async () => {
    await contract.createNewTask("EigenWorld");

    contract.on("NewTaskCreated", async (taskIndex: number, task: any) => {
        console.log(`New task detected: Hello, ${task.name}`);
        await signAndRespondToTask(taskIndex, task.taskCreatedBlock, task.name);
    });

    console.log("Monitoring for new tasks...");
};

const main = async () => {
    await registerOperator();
    monitorNewTasks().catch((error) => {
        console.error("Error monitoring tasks:", error);
    });
};

main().catch((error) => {
    console.error("Error in main function:", error);
});
Environment Setup:
Uses
dotenvto load environment variables.Connects to the Ethereum provider using the RPC URL and private key.
Contract Instances:
- Initializes contract instances for DelegationManager, the main contract, StakeRegistry, and AVS Directory using their ABIs and addresses.
Task Handling:
signAndRespondToTaskfunction signs and submits responses to tasks.registerOperatorfunction registers the operator with the necessary contracts.monitorNewTasksfunction listens for new tasks and handles them.
Main Execution:
- The
mainfunction orchestrates the registration and task monitoring processes.
- The
Tasks Script
Here's a detailed look inside createNewTasks.ts:
import { ethers } from 'ethers';

// Connect to the Ethereum network
const provider = new ethers.providers.JsonRpcProvider(`http://127.0.0.1:8545`);

// Replace with your own private key (ensure this is kept secret in real applications)
const privateKey = '';
const wallet = new ethers.Wallet(privateKey, provider);

// Replace with the address of your smart contract
const contractAddress = '';

// The ABI provided
const contractABI = [
  {"type":"function","name":"createNewTask","inputs":[{"name":"name","type":"string","internalType":"string"}],"outputs":[],"stateMutability":"nonpayable"}
];

// Create a contract instance
const contract = new ethers.Contract(contractAddress, contractABI, wallet);

// Function to generate random names
function generateRandomName(): string {
    const adjectives = ['Quick', 'Lazy', 'Sleepy', 'Noisy', 'Hungry'];
    const nouns = ['Fox', 'Dog', 'Cat', 'Mouse', 'Bear'];
    const adjective = adjectives[Math.floor(Math.random() * adjectives.length)];
    const noun = nouns[Math.floor(Math.random() * nouns.length)];
    const randomName = `${adjective}${noun}${Math.floor(Math.random() * 1000)}`;
    return randomName;
  }

async function createNewTask(taskName: string) {
  try {
    // Send a transaction to the createNewTask function
    const tx = await contract.createNewTask(taskName);

    // Wait for the transaction to be mined
    const receipt = await tx.wait();

    console.log(`Transaction successful with hash: ${receipt.transactionHash}`);
  } catch (error) {
    console.error('Error sending transaction:', error);
  }
}

// Function to create a new task with a random name every 15 seconds
function startCreatingTasks() {
  setInterval(() => {
    const randomName = generateRandomName();
    console.log(`Creating new task with name: ${randomName}`);
    createNewTask(randomName);
  }, 15000);
}

// Start the process
startCreatingTasks();
Environment Setup:
Connects to the local Ethereum network using a JSON RPC provider.
Uses a specified private key to sign transactions.
Contract Instance:
- Initializes a contract instance for the HelloWorld contract using its ABI and address.
Task Creation:
generateRandomNamefunction generates random names for tasks.createNewTaskfunction sends a transaction to create a new task on the blockchain.startCreatingTasksfunction repeatedly creates new tasks every 15 seconds.
Docker Setup
The Dockerfile is used to set up a Docker environment for running the AVS.
FROM node:14

WORKDIR /app

COPY package.json ./
COPY tsconfig.json ./
RUN npm install

COPY . .

CMD ["npm", "start"]
FROM node:14: Uses the Node.js version 14 image as the base image.
WORKDIR /app: Sets the working directory to
/app.COPY package.json ./ and COPY tsconfig.json ./: Copies
package.jsonandtsconfig.jsonto the working directory.RUN npm install: Installs the necessary Node.js dependencies.
COPY . .: Copies the entire project to the working directory.
CMD ["npm", "start"]: Runs the
npm startcommand to start the application.
Contracts
The
contractsfolder has the Solidittyy smart contracts that define the AVS logic. Key contracts include:HelloWorldServiceManager.sol: Manages the "Hello World" tasks and operator responses.ERC20Mock.sol: A mock ERC20 token contract used for testing.
Here's a peek inside HelloWorldServiceManager.sol:
    pragma solidity ^0.8.9;

    import "@eigenlayer/contracts/libraries/BytesLib.sol";
    import "@eigenlayer/contracts/core/DelegationManager.sol";
    import "@eigenlayer-middleware/src/unaudited/ECDSAServiceManagerBase.sol";
    import "@eigenlayer-middleware/src/unaudited/ECDSAStakeRegistry.sol";
    import "@openzeppelin-upgrades/contracts/utils/cryptography/ECDSAUpgradeable.sol";
    import "@eigenlayer/contracts/permissions/Pausable.sol";
    import {IRegistryCoordinator} from "@eigenlayer-middleware/src/interfaces/IRegistryCoordinator.sol";
    import "./IHelloWorldServiceManager.sol";

    contract HelloWorldServiceManager is
        ECDSAServiceManagerBase,
        IHelloWorldServiceManager,
        Pausable
    {
        using BytesLib for bytes;
        using ECDSAUpgradeable for bytes32;

        uint32 public latestTaskNum; // The latest task index
        mapping(uint32 => bytes32) public allTaskHashes; // mapping of task indices to all tasks hashes
        mapping(address => mapping(uint32 => bytes)) public allTaskResponses; // mapping of task indices to responses

        event NewTaskCreated(uint32 indexed taskIndex, Task task);
        event TaskResponded(uint32 indexed taskIndex, Task task, address operator);

        struct Task {
            string name;
            uint32 taskCreatedBlock;
        }

        modifier onlyOperator() {
            require(
                ECDSAStakeRegistry(stakeRegistry).operatorRegistered(msg.sender) == true,
                "Operator must be the caller"
            );
            _;
        }

        constructor(
            address _avsDirectory,
            address _stakeRegistry,
            address _delegationManager
        )
            ECDSAServiceManagerBase(
                _avsDirectory,
                _stakeRegistry,
                address(0), // hello-world doesn't need to deal with payments
                _delegationManager
            )
        {}

        function createNewTask(string memory name) external {
            Task memory newTask = Task({
                name: name,
                taskCreatedBlock: uint32(block.number)
            });
            allTaskHashes[latestTaskNum] = keccak256(abi.encode(newTask));
            emit NewTaskCreated(latestTaskNum, newTask);
            latestTaskNum++;
        }

        function respondToTask(
            Task calldata task,
            uint32 referenceTaskIndex,
            bytes calldata signature
        ) external onlyOperator {
            require(
                operatorHasMinimumWeight(msg.sender),
                "Operator does not have the required weight"
            );
            require(
                keccak256(abi.encode(task)) == allTaskHashes[referenceTaskIndex],
                "supplied task does not match the one recorded in the contract"
            );
            require(
                allTaskResponses[msg.sender][referenceTaskIndex].length == 0,
                "Operator has already responded to the task"
            );

            bytes32 messageHash = keccak256(abi.encodePacked("Hello, ", task.name));
            bytes32 ethSignedMessageHash = messageHash.toEthSignedMessageHash();
            address signer = ethSignedMessageHash.recover(signature);

            require(signer == msg.sender, "Message signer is not operator");
            allTaskResponses[msg.sender][referenceTaskIndex] = signature;

            emit TaskResponded(referenceTaskIndex, task, msg.sender);
        }

        function operatorHasMinimumWeight(address operator) public view returns (bool) {
            return ECDSAStakeRegistry(stakeRegistry).getOperatorWeight(operator) >= ECDSAStakeRegistry(stakeRegistry).minimumWeight();
        }
    }
This contract does a few key things:
Task Creation: The
createNewTaskfunction lets anyone create a new task. It emits an event that operators can pick up.Task Response: The
respondToTaskfunction is for operators to respond to tasks. It checks thaat the operator is legit and that the response is correct before recording it.Weight Check: The
operatorHasMinimumWeightfunction checks if an operator has enough stake to participate.
Running the Show
Once you’ve got everything set up, it’s time to run the show. Here’s the basic flow:
AVS Consumer Requests a Task:
- The AVS consumer requests a "Hello World" message to be generated and signed.
AVS Emits Event:
- The AVS picks up the request and emits an event for operators.
Operator Processes the Task:
- An operator takes the request, generates the message, and signs it.
Submission and Verification:
The operator submits the signed message back to the AVS.
If everything checks out, the submission is accepted.
This simple flow highlights the core mechanics of how AVSs work. You can get more sophisticated with different requests, operator coordination, and various security measures, but this "Hello Worlddd" example is a great place to start.
Conclusion
That's all for this article. I hope you found it useful. If you need any help, feel free to leave a comment or send me a dm on Twitter.
Let's connect on Twitter and LinkedIn.
👋 Thanks for reading! See you next time.